Brief manual for Opti MozJpeg Guetzli WebP
In this brief manual, I will describe the most simple way of setting up and use of "Opti MozJpeg Guetzli WebP" plugin for WordPress.
First install the plugin.
Stable version is available in WordPress's plugins repository. Latest beta version is here
Next install Oracle VirtualBox. It is the free virtual computer emulator. (www.virtualbox.org)
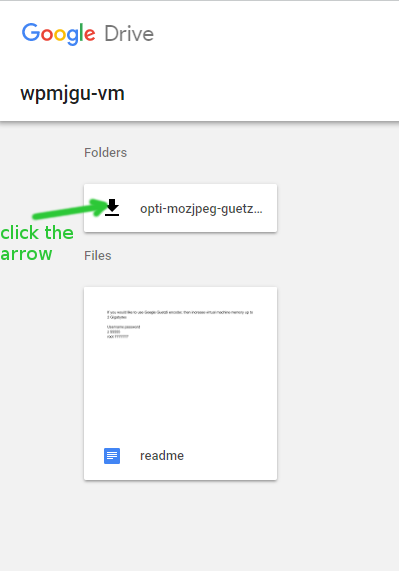
Then download my virtual machine. It contains Linux, ssh server and encoders.
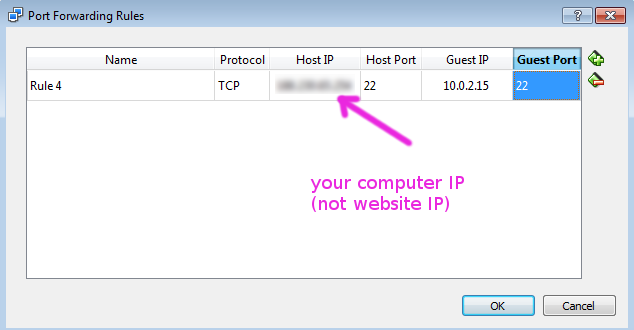
Open my virtual machine in VirtualBox, go to Machine → Settings → Network → Anvanced → Port forwarding. And enter your computer ip address into "Port Forwarding Rules"
If you would like to use Google Guetzli encoder, then increase virtual machine memory up to 2 Gigabytes (Machine → Settings → System → Base memory).
Lunch this virtual machine.
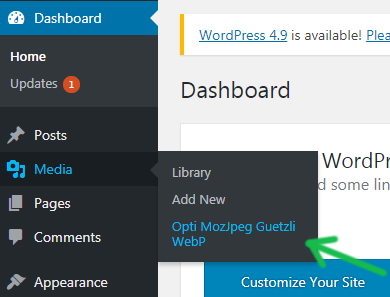
Next open your WordPress website's admin panel. Go to Media → Opti MozJpeg Guetzli WebP → Settings
The first stage of optimization will be:
Mode = Mozilla MozJpeg
Default quality = 80
Minimal benefit from jpeg compression = 10
Jpeg encoder location = remote
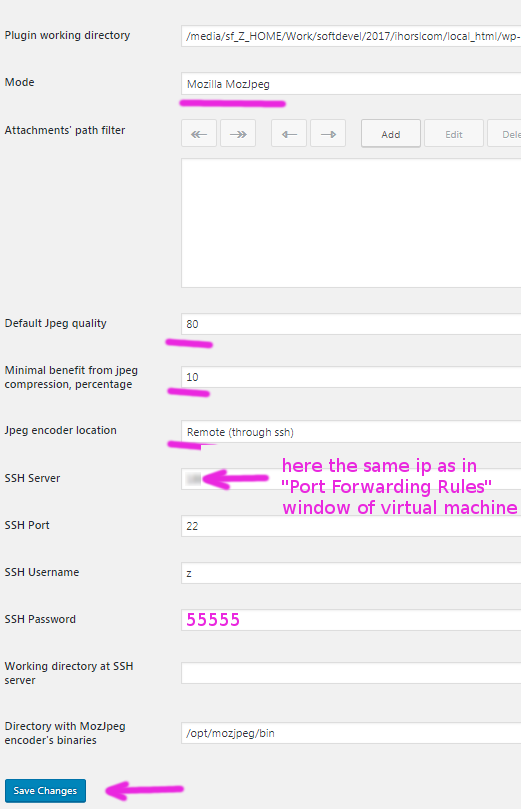
Save settings and go to "Batch optimization". Click "Run batch optimization".
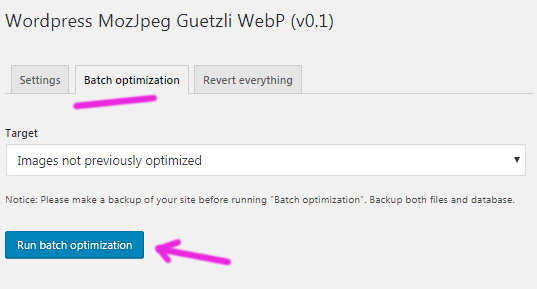
There shouldn't be any issues during optimization process. Read the console to see is everything ok.
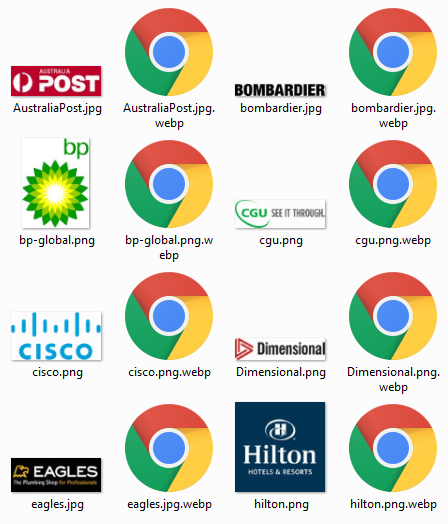
Now we have all images in the site optimized. The second stage will be "Webp duplicates generation". You can read about webp in the internet. The only thing I tell you, is for now there is no other way to get high score in Google Pagespeed Insights, except using of webp images. Because webp is not supported by all browsers, we can't simply convert all images into webp. We will use two files for each image: one for webp compatible browsers, the other for non webp compatible browsers.
So let's generate webp duplicates for images. Get back to "Settings" tab again. And set :
Mode = Google WebP (duplicates generation)
Default quality = 75
Minimal benefit from lossy compression = 5
And click the "Save" button. Then click "Batch optimization" tab. And run optimization for the second time.
If you now open your uploads, you'll see two files for each image.
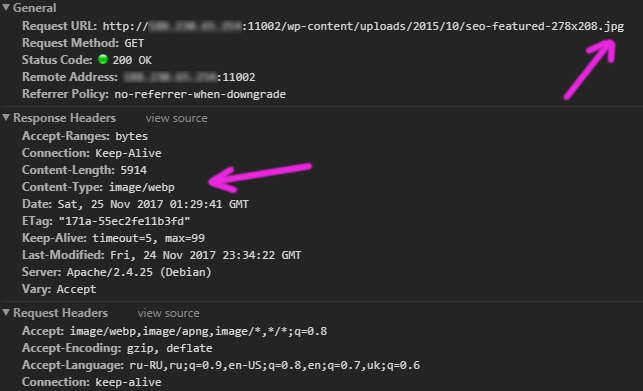
The last thing to do is to setup our Apache to serve webp images to webp browsers. Open your .htaccess and add this :
###
# BEGIN Opti MozJpeg Guetzli WebP
###
<IfModule mod_rewrite.c>
RewriteEngine On
RewriteCond %{HTTP_ACCEPT} image/webp
RewriteCond %{REQUEST_URI} .*(jpe?g|png|gif)$
RewriteCond %{REQUEST_FILENAME}\.webp -f
RewriteRule (.*) %{REQUEST_FILENAME}\.webp [T=image/webp,E=accept:1]
</IfModule>
<IfModule mod_headers.c>
Header append Vary Accept env=REDIRECT_accept
</IfModule>
AddType image/webp .webp
###
# END Opti MozJpeg Guetzli WebP
###
If you browse your site in Google Chrome, you'll notice, that images have the same urls, as before optimization. But actually they contain webp data now.
So, everything is completed now. Test your scores in Google Pagespeed Insights!
P.S.
Here is the video instruction, how to setup plugin's virtual machine in Microsoft Windows desktop.
If you have difficulties with use of the virtual machine in your computer, you may try the plugin author's free online server. Click here to read more.
See also the Frequently Asked Questions page. It is here.